The tools you need
Access to electronics bench and tools (e.g. soldering iron, oscilloscope)
Interlock is a non-profit organization that provides space for its members and the local community to develop and share their interests in science, technology, art, and culture.
Learn MoreInterlock Rochester is a 501(c)3 non-profit Hackerspace whose goal is to provide a physical space and community to its members and the public at large. We provide workshops, classes, and a community of hackers with a wide range of interests: 3D Printing, information security, electronics, micro-controllers, laser cutting, radios, programming, networking, and much more that falls on the geek spectrum.

Interlock began in October of 2009 when a small group of like-minded technologists saw the need for a common work and play space for Rochester’s vast number of talented engineers, designers, and artists. The group was officially incorporated on December 1st, 2009.

The new Hacker Space
To match the demand for more room and private offices, Interlock moved to a larger hackerspace in the same complex.

Current Day
With a new coat of paint and projects awaiting to get done. Interlock is as strong as ever. We look forward to any new members reading over the website to come drop by on open night and come hang out with the crew
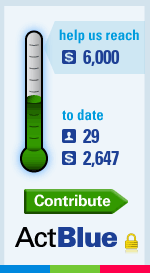 Please help support our efforts to raise money to save Interlock Rochester. After after 10 years of being in service,
we're due for either a reboot or we have to shut our doors. We're doing a push now to find the next generation of
members that are interested being part of a fun community as well as doing a fundraiser drive.
Please help support our efforts to raise money to save Interlock Rochester. After after 10 years of being in service,
we're due for either a reboot or we have to shut our doors. We're doing a push now to find the next generation of
members that are interested being part of a fun community as well as doing a fundraiser drive.
First the money goes to pay our rent and operations. That is the bare minimum to keep the doors open. After we've hit that goal, we will be investing into the space itself to rebuild it into what our members use it most for. This could include new furniture, Updated workspaces, Better A/V systems, Borrowable tools and equipment... and more! If you're interested in ways to improve the space, tell us and we can help you.
If you're in the area, consider becoming a member or if you're out-of-town, consider setting up a regular donation. That's the biggest help. But you can also help us by donating your time to rebuild the space. Reach out to a member and see where you might be able to get involved. Hang out on our IRC or Slack channel, attend meetings. Enjoy the space! That's what it's for in any case.
A hackerspace is a physical location for individuals to gather, collaborate, socialize, work on projects, and make things. There are more than 350 hackerspaces worldwide that have registered with Hackerspaces.org, a lot of which have been established for several years, while some are still in the early planning stages.
Access to electronics bench and tools (e.g. soldering iron, oscilloscope)
Dedicated classes on several subjects and a community of helpful members in several fields
The members of Interlock Rochester have diverse backgrounds and interests, and there are no requirements for background knowledge. You do not need to be an expert in any given area of computing, science, mathematics, or art. We take pride in welcoming anyone into our community who has a genuine interest in learning, sharing, and collaborating on ideas and projects.
Members have a very wide range of backgrounds including 3D Printing experts, electronics engineers, radio enthusiasts, programmers, information security boffins, network admins, classic arcade aficionados, and the list goes on. Members often bring their personal projects to space to share or ask for help on. You can see what projects we’re working on at our Wiki. Members often work in teams to complete their projects. If you have a project you’re looking for a partner in, stop by and meet the group.